It's Official: "Best. Shrimp. EVER!"

Thursday, April 29, 2010


Looking for a new way to do a shrimp appetizer? My Coconut Shrimp are a must-try then! They are by far my friends' favorite shrimp dish that I do, and probably the second most highly requested food item when they come over (ribs being the first). They're sweet, spicy, savory, crunchy and will be the guaranteed favorite food at your next party too.
Coconut Shrimp with Spicy Mango Dipping Sauce
1 lb shrimp, shelled and deveined (tails removed - optional)
1 cup all-purpose flour
1 cup beer
3/4 tsp baking soda
1/2 tsp salt
1/4 tsp African bird's eye pepper OR 1 tsp cayenne pepper (to taste)
1 egg
1 (16 oz) bag sweetened shredded coconut
peanut oil
1/2 cup spicy mango chutney
1 Tbsp Dijon mustard
1 tsp rice wine vinegar or juice of 1 lime
Pour the peanut oil into a heavy pot (cast iron is best) until you have about 2-3 inches high of oil. Heat the oil until it reaches 350 degrees on a candy thermometer. Conversely, if you place the handle part of a wooden spoon and small bubbles start to form around it, you know it's ready for frying. While the oil heats, prepare the shrimp.
Take shrimp and pat very dry with paper towels. The drier the shrimp, the more the batter will stick to them. Set aside.
In a medium-sized bowl, whisk together the flour, beer, baking soda, salt, cayenne pepper and egg until a smooth batter is formed. You want the consistency to be of thick pancake batter, so you may need to add more beer depending on what kind you use. Drop the shrimp in the batter and make sure they're all evenly coated.
Layer out the shredded coconut in a large baking dish, about the size you'd use for a lasagna. Take the shrimp, one at a time, and lay out on the coconut in one even layer, careful not to overlap. Gently press down on the coconut to get it to stick to the batter (it should stick pretty easily), then turn the shrimp over and get the other side coated.
Drop the shrimp in the oil, about 4-6 at a time depending on how big your shrimp are, and fry until golden brown on all sides, about 40 seconds per side. You'll have to turn them over once during the frying process as shrimp tend to lap over to one side when frying. Once golden brown, remove gently with a slotted spoon or "spider" and onto a plate lined with paper towel. Use the spoon to remove any pieces of floating coconut in the oil. Repeat process with remaining shrimp until they're all done.
Quickly make the dipping sauce. Combine the mango chutney, mustard and vinegar or lime juice in a food processor and process until the pieces of mango are minced and the sauce combines. Pour into a serving bowl and serve.
My notes:
You can do the dipping sauce up to 3 days in advance. Want a milder sauce? Use a mild chutney. I use Indian mango chutney that I find in the international foods section of my market. If you can't find mango chutney, then use apricot jam or even orange marmalade. And to get it spicy, drop in a minced jalepeno or serrano pepper to taste.
The coconut burns very, very quickly, so it's imperative that you skim off as much coconut "floaters" as possible during batches. You won't be able to get them all, but do try to get most out. This gives the oil a chance to come back up to 350 degrees again as well.
My favorite shrimp to use are Gulf shrimp (from Louisianna). They're the sweetest and simply best shrimp. Do not use Tiger shrimp (from Thailand or wherever); they have zero taste and take longer to cook. You want medium-sized shrimp for best results.
My recipe calls for African birds eye pepper. This is an extremely spicy pepper, about twice the power of cayenne. If you can find it and love spicy then I recommend using it. If you can't find it or want to relax the spicy factor, then use cayenne and do it to taste. My recipe is for a 6 on a 1-10 spicy scale using the african/cayenne measurments; adjust accordingly.
Make-ahead tip: ask your fish person to peel and de-vein your shrimp for you while you shop!
You can't reall make the shrimp ahead of time. When frying you need to do right before guests arrive or as they are coming in. What you can do, however, is fry them about 10 minutes before guests arrive and then keep them spread out on a baking sheet in a 275 degree oven for 10-15 minutes. This will keep them warm and toasty without over-cooking them or burning the coconut.

Meet Mojito's Counsin: The Mint Julep

Wednesday, April 28, 2010


When I think of the Kentucky Derby the first thing that comes to mind after the horses, of course, is the Mint Julep. It's the official drink of the Kentucky Derby, and one hell of a refreshing cocktail on a warm day.

Its genesis might surprise you.

The word "julep" actually comes from Arabic, whereby the Persians woud drink beverages called "julabs" that were sweetened by rosewater and were drunk out of metal cups. In the hot dessert sand, the metal cups when filled with ice kept the drink inside very, very cold for a much longer period of time. At one point the "julep" transferred into mainland Europe where the English took to it, combining a generic spirit with crushed mint that was served in a similar (albeit much less elaborate) metal cup. This drink in turn made its way to the south vis-a-vis English settlers and bourbon, made in abundance from the corn fields that thrived there, was replaced as the primary spirit for the drink.

During the 1700s bourbon and gin were used interchangeably in the south for the first drink of the day. Planters rose early to till the rich soil in the south, and the hot, muggy mornings were often christened with the clinking of metal cups containing the bourbon-mint concoction. In fact, their drinkers believed it warded off malaria. I think it was just a refreshing drink on a hot summer's day!

As the years went by expensive whiskey and even brandy temporarily replaced bourbon as the star of the very popular drink. But post-Civil War south, now broke, had to revert back to the cheaper (and I think tastier) locally grown and distilled bourbon rather than the imported Irish whiskeys and French brandies.

And with its simple but refreshing combination of smooth bourbon and crisp cold mint, The Mint Julep took its place as the official drink in Kentucky and eventually of the Kentucky Derby, where sellers couldn't keep up with the demand.

To this day the most traditional of juleps are still served in silver or pewter cups, often charged for and kept as souvenirs from the race. But more often we see them served in basic tumbler glasses, well chilled and piled high with refreshing crushed mint.

The cocktail is quite similar to a mojito and is done in a very similar fashion. You must gently crush the mint (not pulverize it) to extract the essential oils in the leaves. Some recipes use the technique of steeping the mint leaves in the simple syrup, something I often do for cocktails, in order to get that great taste without having to worry about pieces of mint that get stuck in between your teeth. Whereas this drink is sexy, a piece of green leafage when you smile alas is not.

The drink is great and you'll have fun making it and drinking it. Adjust the amount of simple syrup to your taste; some like it sweeter, some like it harder (more bourbon). The choice is yours.

Now check out my recipe for a classic Mint Julep:


Mint Julep
fresh mint (peppermint or spearmint is fine)
crushed ice
2 tablespoons mint simple syrup (see recipe below)
2 tablespoons water
2 ounces good-quality Kentucky bourbon (recommended: Maker's Mark)


Crush or muddle a few mint leaves in the bottom of an 8-ounce mint julep cup (or tumbler), breaking up the leaves but not pulverizing them. Fill the cup 1/2 full with crushed or shaved ice. Add desired amount of mint simple syrup, water, and bourbon. Stir until the silver cup is frosted on the outside. Garnish with more un-crushed mint leaves on top.

Note: if using a glass tumbler the outside won't frost; to achieve this effect you'll need to freeze your tumblers before use for half an hour.

Mint Simple Syrup:
1 cup granulated sugar
1 cup water
1 bunch fresh mint

In a medium saucepan, combine sugar and water. Add the mint leaves and gently crush them with a wooden spoon, releasing their essential oils. Bring mixture to a low simmer and cook for 3 minutes. Remove from heat and let stand at least 10 minutes so the mint leaves can continue steeping. The longer you leave the mint in, the stronger the flavor will be. Remove mint leaves and pour syrup through a sieve if necessary to remove any mint particles. It's now ready to use.

Refrigerate syrup if using later. Can be made 2 days in advance.


You Say "Hot Brown" ...I Say "Hot Damn!"


Need a snack to go with that Mint Julep this weekend for the Kentucky Derby? Try making the classic Derby sandwich called a Hot Brown.
It's an open-faced sandwich comprised of freshly roasted sliced turkey breast, good bread, a classic cheese sauce called Mornay (a bechamel sauce with equal parts of Gruyere and cheddar cheeses (usually white cheddar) and then topped with shredded Parmesan cheese), and some bacon and tomato for garnish. It's an amazing sandwich packed with all sorts of salty, strong flavors that boldly trump most sandwiches. With the cheese sauce, you can think of it as a Croque Monsieur on steroids.
The Hot Brown was conceived by chef Fred K. Schmidt in 1926 at the famous Brown Hotel in Louisville, Kentucky. Originally it was made as a more substantive late-night snack for guests, but the sandwich has evolved not only to be Kentucky's answer to New Orleans muffaletta, but
the official sandwich of the Derby.
Variations include a generic cheese sauce made from processed cheese but that's not a real Hot Brown. You have to spend the time and love in making that Mornay and the payoff will be amazing, I promise you. And don't skimp on the turkey either. Using sandwich deli meat is not going to cut it for this sandwich (no pun intended); you need that thick, juicy slice of roasted turkey to pull this monster off.
If you're planning to make an event of watching The Derby this weekend then make this sandwich. Or if you want to bump up your next brunch with something classic and seeped in history and flavors, then this is your go-to as well.
Here's a recipe from from Chef Nick Sundberg that hits the classic notes of the sandwich:
Hot Brown Sandwich
3 ounces turkey breast, roasted, sliced
1 slice toasted white bread
2 slices tomato
2 slices bacon, cooked and drained
for the sauce:
2 ounces butter
3 ounces flour
3/4 cup cream
1/4 cup milk
1/2 cup Gruyere or Swiss cheese, grated
salt and white pepper to taste
Heat butter and add flour. Whisk and slowly cook for 5 minutes. Whisk in cream and milk and heat. Whisk in cheese until melted. Season. Simmer for 30 minutes. Sauce should be very thick.
Quarter toast and place in an oven safe dish. Top with turkey and tomatoes. Cover well with sauce. Bake at 400° for 10 minutes. Garnish with bacon.
My Notes:
Want to make this for a crowd? Instead of making every sandwich individually, portion out everything according to number of guests (double, triple the recipe etc. as needed). Yes, you will end up with an obscene amount of sauce but the whole thing needs to be literally drowning in that Mornay, so go for it. Place all the sandwich components in a large casserole dish and bake off at the same time. Then cut into it as you would a casserole.
If you want to play around with the cheeses then do a half gruyere-half white cheddar combination. Or all cheddar. Or all gruyere or swiss. Try not to venture off into other cheeses though because the sauce really needs to have that "punch" a good sharp cheese has, and the meltability a cheddar or gruyere can offer. So stay away from the aged provelones that won't melt as well. And go ahead and top it all with some grated Parmesan too if you like!
Not into the meat? A vegetarian style has become popular in recent years. Substitute the turkey with grilled vegetables and in stead of bacon top with thinly sliced avocado. The cheese sauce will go very well with the vegetables as well.
This recipe calls for white pepper. It's the classic pepper of choice for white sauces so as it can blend in better to the eye, and offers a milder pepper taste than the traditional black pepper. Don't have it? Just use black pepper.

Fish Tacos Bobby Flay Style

Tuesday, April 27, 2010

With the weather starting to warm up and Cinco de Mayo coming up fast, I thought I'd post one of my favorite fish tacos recipe from Bobby Flay. It's labor-intensive because it has multiple components, so this is a weekend meal to do relaxing by the grill with a beer or margarita in one hand and your spatula in the other. But I promise you the payoff is amazing and if you're having guests over, you'll be a Culinary God or Goddess.

This recipe calls for mahi mahi which is an easily available, flaky white fish. Can't find it? Use halibut or even sea bass instead. On a budget? Use a good fresh (not frozen!) red snapper and make sure you buy a little extra to make up the volume.

The flavors of bright citrus in the vinaigrette instantly liven up the smooth, flaky white fish. And the sweet but spicy pineapple-habenero hot sauce is cooled off instantly with the smooth avocado-tomato relish. It's quite literally a perfect dish where every flavor is hit at the same exact time, and your mouth with explode with gratitute and awe. Try it this weekend!

Grilled Mahi Mahi Tacos with Red Cabbage Slaw, Tomato and Avocado Salsa, and Pineapple Hot Sauce
4 (8-ounce) mahi mahi fillets
2 tablespoons canola oil
salt and freshly ground black pepper
citrus vinaigrette (recipe follows)
8 (6-inch) flour tortillas, cut into 2 1/2 to 3-inch circles, and deep fried
red cabbage slaw (recipe follows)
tomato and avocado salsa (recipe follows)
pineapple hot sauce for drizzling (store bought or recipe follows)


Preheat grill.

Brush fillets with oil and season with salt and pepper. Grill for 3 to 4 minutes per side.
Remove from grill and drizzle with some of the Citrus Vinaigrette. Let rest 5 minutes and then flake with a fork.

Fill each fried tortilla with some of the mahi mahi and top with the red cabbage slaw, tomato and avocado salsa, and drizzle with charred pineapple-habanero hot sauce.


Citrus Vinaigrette:
3/4 cup orange juice
1/4 cup lime juice
1 cup fresh basil leaves, chopped
1 cup fresh cilantro leaves
1 teaspoon kosher salt
1/4 teaspoon freshly ground black pepper
1 heaping tablespoon honey
1/2 cup canola oil


Combine all ingredients in a blender and blend for 1 minute.

Red Cabbage Slaw:
1/4 cup rice vinegar
1 tablespoon sugar
2 tablespoons canola oil
1/4 head red cabbage, finely shredded
1 large carrot, cut into fine julienne
1/4 cup chopped cilantro leaves
Salt and pepper


Combine all ingredients in a bowl. Season with salt and pepper, to taste.

Tomato and Avocado Salsa:
4 plum tomatoes, chopped
2 ripe Hass avocados, peeled, pitted and diced
1/2 small red onion, finely chopped
1 serrano chile, finely diced
1 to 2 limes, juiced
2 tablespoons canola oil
1 to 2 teaspoons honey
3 tablespoons chopped cilantro leaves
Salt and freshly ground black pepper

Gently combine all ingredients in a bowl. Season with salt and pepper, to taste.

Charred Pineapple-Habanero Hot Sauce:
1 ripe pineapple, preferably Golden pineapple
2 tablespoons canola oil
1 large Spanish onion, coarsely chopped
1 container frozen pineapple puree, thawed
2 habanero chiles, chopped
1 cup rice wine vinegar
Salt and pepper
Honey

Heat a grill to high or preheat the broiler. Place the whole pineapple (do not peel it) on the grill and grill until the entire surface is completely black and charred. Remove from grill and let cool slightly. Peel the pineapple, remove the core and coarsely chop the flesh.

Heat oil in a medium saucepan over medium-high heat; add the onion and cook until soft. Add the pineapple, pineapple puree, habanero and vinegar and cook until the mixture is completely soft, about 25 to 30 minutes. Transfer to a blender and blend until smooth. Season with salt, pepper and honey, to taste. Strain the mixture into a bowl.
My Notes:
Can't do the pinepalle habenero? Try mixing some pureed pineapple and your favorite hot sauce in a food processor.
And remember when working with peppers make sure to wash your hands thoroughly with water AND SOAP to remove the pepper juices! Especially ladies if you have longer fingernails -- those seeds and juices come through and go right under there. Even if you wash your hands the pepper will still be under there so make sure you take a sponge or brush and get underneath or else next time you scratch or rub your eyes you'll pay for it!
Even better - wear gloves when working with peppers. :)
Serve the tacos with ice cold Corona and limes or margaritas. Enjoy it!

Cardamom + Carrots = Cupcakes? Oh Indeed...Read On

Monday, April 26, 2010

Meet my friend Christa:


Christa's an avid baker. I admire bakers pretty much because I can't bake. I'm a Scone To Crumble kind of gal. And it's not because I don't like to bake. I very much do. I just am simply not good at it. I lack the precision. Let's face it - I lack the bloody patience.

That said, occasionally I'll find a recipe that I must try. It will haunt my brain until I finally get the ingredients, make the baked yummies, and then fix myself a hot cup of tea or coffee and enjoy. Christa sent me such a recipe from Simply Recipes for a classic carrot cake updated with spices of the east. And I love that. These carrot cupcakes are easy to make but with the addition of a cinnamon-cardamom combination (yay cardamom!) and sweet fragrant organge zest, this recipe hits it out of the park. It's sweet, it's spicy, and gives you a much tastier option to use up that massive bag of carrots.


Christa's tip is to add a "handful" of raisins to the second batch of cupcakes to appease the pro/anti-raisin populace. I do this often with nuts as well. This basically means to cut your main batter in half, and if you have people who don't dig the nuts or raisins (or whatever else you're adding) then make the first batch without and then throw in the ingredients with the second batch, give it a quick mix, then go ahead an fill your tins and bake away.
And without further adieu, the recipe:

Carrot Cupcakes with Cream Cheese Frosting
1 cup chopped walnuts
1 lb carrots
3 large eggs
1/2 cup buttermilk (or 1/2 cup of regular milk + 1 tsp lemon juice, let stand for 10 min)
1 tsp vanilla extract
2 cups sugar
1 cup vegetable oil
1 Tbsp orange zest
3 cups all-purpose flour
1 tsp baking soda
2 tsp baking powder
1 tsp kosher salt
2 tsp ground cardamom
1 tsp ground cinnamon
1 cup raisins (optional)
cream cheese frosting (recipe follows)
Preheat oven to 350 degrees.
Toast walnuts in oven for 5 minutes. Remove and set aside to cool.
Peel, rinse and grate the carrots. Place the grated carrots, eggs, buttermilk, vanilla extract, sugar and orange zest in a bowl and whisk together to combine.
In another bowl, combine the flour, baking soda, baking powder, salt, cardamom and cinnamon and whisk to combine.
Fold the flour mixture into the carrot mixture, being careful not to overmix. Fold in the walnuts (and raisins if using).
Scoop batter into paper-lined cupcake trays and fill about 1/2-3/4 of the way full. Bake in oven for 19-21 minutes, rotating the pan halfway through. Let stand to cool in baking trays 5 minutes before removing, then let finish cooling on a wire rack before frosting.
Makes 24 cupcakes.
Cream Cheese Frosting
1 cup unsalted butter
16 oz Philadelphia cream cheese
1.5 cups powdered sugar
Cream the butter and cream cheese together, then add the sugar and beat on high until light and fluffy.

Spanish Style Part 1: A Breakfast Inspired By The Canary Islands

Monday, April 19, 2010

Andrew, the kids and I recently went over to our friends Jeff & Damilya's to check out their new place and partake in an amazing brunch. Inspired by flavors of Spain vis-a-vis the Canary Islands, Jeff and Damilya put forth a truly inspiring menu for my favorite meal of the day. Bold flavors together with equally bold colors made for a memorable brunch that I can't wait to have a free weekend to do myself.


A combination of a few recipes from The Los Angeles Times and The New York Times together with some recipes of their own, Jeff and Damilya provided a wonderful culinary journey that took us through sweet and savory, velvety smooth to crunchy. I loved every single bite of everything, and they were kind enough to share with me (and you!) their recipes.


On the menu...


Light As Air Scrambled Eggs with Scallions and Romano Cheese

Sausage and Peppers with Vermouth

Papas Arrugatas - "Wrinkley Potatoes "

Mojo Verde and Mojo Colorado

Freshly Baked Bread

Tiramisu

Mimosas and Coffee


Sadly, I was lame and forgot my camera so the shitty pictures taken from my Droid will have to do. Apologies.

The star of the show for me personally were the potatoes. A dish originally conceived by Canary Island locals with the bounty of New World potatoes brought through by Spanish explorers, the potatoes were boiled in clean sea water down until all the water evaporated, leaving a wonderful natural sea-salt crust around the perfectly softened potatoes. You can achieve the same result using tap water and a good amount of sea salt from your pantry:

"Wrinkley Potatoes" aka Canary Island Style Salted Potatoes
1 1/2 pounds small potatoes
1 tablespoon coarse salt
2 cups water

Place the potatoes in a wide pan with the salt and water. Bring to a boil and cook on a high heat until all the water has evaporated, about 20 minutes. The potatoes should be tender, coated with white salt and their skins slightly wrinkled. They can be reheated by adding a small quantity of water and allowing it to boil off.
If using very small new potatoes, cook them in the water just until tender when probed with a skewer. Drain off the excess water and return the potatoes to the heat to dry them.

Serve with mojo (recipes follow).


Mojo Verde aka "Green Sauce"
2 cloves garlic
1 jalapeño pepper, or to taste
1/2 teaspoon ground cumin
1 teaspoon oregano
2 tablespoons chopped parsley
1/2 cup loosely packed cilantro leaves
3 tablespoons olive oil
3 tablespoons wine vinegar
1/2 teaspoon salt
1/4 cup water

Place all ingredients in a blender container and blend until smooth. Sauce keeps one week, refrigerated. Serve it at room temperature.


Mojo Colorado aka "Red Sauce"
3 tablespoons pimentón or paprika
1 fresh red chile, seeded and chopped, or cayenne to taste
3 cloves garlic
3 tablespoons olive oil
3 tablespoons wine vinegar
1/2 teaspoon ground cumin
1/2 teaspoon salt
1/4 cup water

Place all of the ingredients in a blender and blend until smooth. If desired, thin with a little water. Sauce keeps one week, refrigerated. Serve it at room temperature.


Mojo is a sauce used in Spanish cuisine that is often used as a finisher much like pesto or a gremoulata is used in Italian cooking. It can be used quite literally on anything from potatoes to grilled meats (especially wonderful with a grilled skirt steak!) to even dipping for freshly baked bread. The recipes above can easily be doubled so make a big batch and use it throughout the week with the rest of your dishes.


In addition to the wonderful potatoes and mojo, Jeff made the most amazing take on sausage and peppers. By using vermouth, he created a wonderfully sweet flavor that complimented the sweet peppers and onions and paired perfectly with the leaner but still flavorful turkey sausages. This was a great dish that went beautifully with the eggs. And don't worry about the amount of vermouth you're using. As Jeff said, "you're doing this like risotto" so the alcohol is burning off as you add and leaves a wonderful concentrated sweet flavor.


Sausage and Peppers with Vermouth
1 lb Italian turkey sausage, cut into large chunks
1 medium red onion, sliced
1 small red bell pepper, seeds removed and sliced
1 small green bell pepper, seeds removed and sliced
olive oil
salt
freshly ground black pepper
about 1 cup of sweet vermouth

Heat a couple of tablespoons of olive oil in a large pan. Add the sausage and onion together and begin to brown, cooking for about 5 minutes. Add the vermouth, about a 1/4 cup at a time to the sausage and onion, and continue to cook on medium-high heat until the vermouth is absorbed. Keep adding the vermouth as it gets absorbed until the amount is used up and the onions are thickened and a very thick sauce is starting to form. Add the bell peppers and season with salt and pepper to taste. Continue to cook until the peppers soften and are combined, about five minutes. Serve hot.

This recipe serves 4 but can easily be doubled.


Scrambled Eggs with Scallions and Romano
3-4 scallions, finely chopped
2 Tbsp butter
8 eggs
1/4 cup heavy cream (or half n half)
salt
freshly ground black pepper
1/3 cup grated Romano cheese (can substitute Parmesano-Reggiano)

Heat the butter in a large non-stick skillet. Add the scallions and saute on medium-low heat, about 3 minutes, stirring occasionally.

While the scallions cook, combine the eggs and heavy cream in a large bowl and whisk together vigorously. The more you whisk, the more air you get into the eggs and that's what makes them fluffy when you cook them. Season with salt and pepper to taste and pour the eggs over the scallions. Using a spatula, gently move and stir the eggs around in the pan until they begin to set. Add the cheese and mix in. Serve immediately.

This recipe is also for 4 but can easily be doubled.


For more pictures and recipe of this brunch (we still have that freshly baked bread to discuss!), check out Part 2.

Spanish Style Part 2: No-Knead Bread From Scratch? No, Hell Hasn't Frozen Over...It's Just A Brilliant Idea

To go with the insanely flavorful meal Damilya made the most awesome fresh bread from scratch. Repeat: from scratch. I told her I desperately needed the recipe so I could share it with you all, and here it is!

She got it from a New York Times article by Mark Bittman back in November about a baking technique devised by Jim Lahey from Sullivan Street Bakery in Manhattan that requires no kneading! Yes, no kneading bread! It's perhaps the easiest bread recipe in the history of bread making quite frankly, as all you need to do is mix the ingredients at the beginning and then just leave it alone for quite literally a day. Just neatly wrapped in a kitchen towel, off to the side of your kitchen while you sleep, eat, and go about your normal day for up to a full 24 hours!


And the baking technique is interesting as well, as it's baked not on a stone or baking sheet, but inside a heavy cast iron pot or Dutch oven! This gives the bread a wonderful texture that you will just fall in love with. To read the full article check out this link. And now...on to the recipe!

No-Knead Bread
Adapted from Jim Lahey, Sullivan Street Bakery

3 cups all-purpose or bread flour, more for dusting
¼ teaspoon instant yeast
1¼ teaspoons salt
cornmeal or wheat bran as needed

In a large bowl combine flour, yeast and salt. Add 1 5/8 cups water, and stir until blended; dough will be shaggy and sticky. Cover bowl with plastic wrap. Let dough rest at least 12 hours, preferably about 18, at warm room temperature, about 70 degrees.

Dough is ready when its surface is dotted with bubbles. Lightly flour a work surface and place dough on it; sprinkle it with a little more flour and fold it over on itself once or twice. Cover loosely with plastic wrap and let rest about 15 minutes.

Using just enough flour to keep dough from sticking to work surface or to your fingers, gently and quickly shape dough into a ball. Generously coat a cotton towel (not terry cloth) with flour, wheat bran or cornmeal; put dough seam side down on towel and dust with more flour, bran or cornmeal. Cover with another cotton towel and let rise for about 2 hours. When it is ready, dough will be more than double in size and will not readily spring back when poked with a finger.

At least a half-hour before dough is ready to bake, heat oven to 450 degrees. Put a 6- to 8-quart heavy covered pot (cast iron, enamel, Pyrex or ceramic) in oven as it heats. When dough is ready, carefully remove pot from oven. Slide your hand under towel and turn dough over into pot, seam side up; it may look like a mess, but that is O.K. Shake pan once or twice if dough is unevenly distributed; it will straighten out as it bakes. Cover with lid and bake 30 minutes, then remove lid and bake another 15 to 30 minutes, until loaf is beautifully browned. Cool on a rack.

Yields one 1½-pound loaf.

Damilya's Notes:

1. King Arthur Flour is a good quality bread flour. For White Flour, be sure to get unbleached flour FOR BREAD. If you want to make wheat bread, use a mixture of white and wheat. If you make 100% wheat, the bread may be too dense and heavy. I use roughly one cup of wheat flour and two cups of white. You can obviously change the proportions. But do so at your peril!!!

2. I use 2 teaspoons of salt, which is more than what the recipe calls for.

3. I use a tad more than a 1/4 teaspoon of yeast. It gives the dough an airier, lighter texture, which I like. I use a tad more water than the recipe calls for. I find it makes the loaf lighter.

4. Any additions (ie: caraway seeds, rosemary, raisins, nuts etc.) should be added at the beginning, although you could add them in between the first and second rise. I add in a half cup of ground flax seed. It gives the bread more dietary fibre for greater "regularity." Flax seed is also rich in omega fats. This extra ingredient requires more water to be added to absorb the flour and flax seed.

5. I let the bread dough stand for the first rise 16-18 hours, although as little as 12 hours is also fine and as much is 24 hours is ok. I let it stand for 2-3 hours for the second rise, but it can be less -- or more.

6. I occasionally omit the intermediary step of letting the bread sit for 15 minutes with saran wrap over it. I'm not sure the point of it. If anyone figures it out, let me know!

7. The absolute key to baking is to make sure the pot is ultra hot. Be sure to follow the directions carefully about heating the pot in the oven for 30 minutes with lid on, BEFORE you put the bread in. This is essential.

8. I bake the bread for 30 minutes with the lid on, and only 10-15 minutes with the lid off. Every oven is different.

9. A hint about clean up. Remember that water and flour makes paste. So when you clean up, it's easier if you wash the bowl in cold water, not hot water. It took me a while to figure that one out!

10. This is a very forgiving recipe. You do not need to be obsessively accurate (my favorite kind of recipe!) I remain on stand-by for any bread consults you might need! Happy Baking!!!


Need more help? Check out this youtube video on how to make this bread:
http://www.youtube.com/watch?v=13Ah9ES2yTU

Now go make this! You will thank me later!

A Modern Take On a Breakfast Classic: Smoked Salmon and Oatmeal Galette with Herb Poached Egg and Lemon-Caper Emulsion

Thursday, April 15, 2010

My friend Christa recently turned me on to this fabulous recipe for a spruced up version of Eggs Benedict. It calls for smoked salmon (one of my favorite combos with egg) and instead of the dry cracker known as English muffin, Chef Dee Nguyen from Break of Dawn restaurant in Laguna Beach does a simple but tasty oatmeal pancake called a "galette." If you're looking to update a breakfast classic or having a special brunch soon, this is a meal that's sure to please!


Smoked Salmon and Oatmeal Galette, Herb Poached Egg, Lemon-Caper Emulsion


Serves 4


Good quality smoked salmon
1 recipe oatmeal galette (recipe follows)
1 recipe poached eggs (recipe follows)
1 recipe roasted tomatoes (recipe follows)
1 recipe lemon-caper emulsion (recipe follows)


Oatmeal Galette:
1 cup instant oatmeal
1 1/2 cup whole milk
1 cup pancake batter (your favorite)


Combine oatmeal and milk-refrigerate over night. The next day, fold in pancake batter until mixture is smooth; season with salt and pepper. Pan-fried galette with vegetable oil in a non-stick pan.


Herb Poached Egg:
8 each egg
1 gallon water
2 tablespoon rice vinegar
1 teaspoon salt
4 ounce butter, melted
1 teaspoon dill, chopped


Combine water, vinegar and salt in sauce pot-make sure water level is about 4 inches high. Bring water to a simmer and drop cracked eggs into water slowly. The simmering water with vinegar and salt will help coagulate the egg white quicker, forming each egg into a nice oval shape-this will need some practice. Remove poached egg after two minutes or until white is set. Pour butter and dill over eggs and season with salt and pepper.


Marinated Tomato:
1 each tomato, small dice
1 teaspoon fennel seed, toasted
1 teaspoon shallot, chopped
1 teaspoon extra virgin olive oil


Combine all ingredients and season with salt and pepper-let it marinate at least one hour for a better flavor.

Lemon-Caper Emulsion:
1 each egg
1 each lemon juice and zest
1 tablespoon water
1/2 teaspoon mustard
1 cup extra virgin olive oil


Combine first four ingredients in the blender at low speed. Slowly add the oil to form an emulsion. Season with salt, pepper and a pinch of cayenne pepper. You might need to add some water to thin down the sauce.


To Assemble:
Lay out an oatmeal galette on each plate. Top with some smoked salmon, then a poached egg, add the tomato to the sides and then drizzle the whole dish with the lemon-caper emulsion, concentrating more of it on top of the poached egg. Serve immediately.

Passport To England: A Medieval Inspired Meal Fit For Henry VIII!

Monday, April 12, 2010


To celebrate the final season of one of our favorite TV shows, The Tudors, I decided to make a medieval-inspired meal to enjoy while we took in the first episode. Although I'm no stranger to cooking random medieval meals (one of my favorite culinary books actually is on medieval cookery), I still don't really do it on a regular basis. Or yearly basis for that matter.

But that might change with these recipes.

Medieval cooking has the reputation of being a lot of roasted meats. Certainly they did roast their meat, but the majority of average day-to-day cooking was comprised of stews and soups, braises, pastries, and stewed fruits with freshly made cream (called "snow"). For our meal this past weekend, I was looking for something not too involved, something I could portion down (no need to roast a beast just for the two of us), and something that was just...different.


I hit it out of the ballpark with my adaptations of two classic recipes and techniques. A chicken stew of sorts flavored with dried fruits, wine and spices that quite literally will get your entire house smelling medieval in a matter of minutes, and a simple but tasty leek pastry. Everything I made was with items I had on hand, ingredients readily available at the local market. And although the techniques are still much the same, the different flavor combinations brought me back to a time and place far away where the same spices warmed the hearth of the castle as it does your stomach.

I did some research and found a wonderful recipe for Chicken Pye. "Pye" (pronounced "pie") is actually a form of braising, whereby you place different cuts of meats in a heavy bottomed pot and then bake it until tender. These pyes were often topped with a dough crust on top, or just left and topped with a lid and simmered.


Pye is similar to "pie" where a dough is used to achieve the same thing as the pot. In a way, pie is like an edible dutch oven. But in medieval times, they called today's pies "paest" or "paestry" (aka "pastry") or "patsies" which is a term still used by the English today.

So...


"pye" is "pie" with or without a top crust; "pie" is a "paestry" and a "pastry" is a "pudding."
But back to the "pye." As a braising technique, it's a chunky combination of meats, fruits or vegetables, spices, and some sort of liquid (back then that would be wine, ale, or just plain water) that is allowed to stew together in a heavy pot in the oven for a couple of hours until everything is tender and the liquids have turned into a super-infused, thickened sauce.
So for all intents and purposes, "pye" = "stew."

Got it?

Let's go on...

I chose this particular recipe mostly because I had all the ingredients in the pantry. It turned out to be wonderfully flavorful, peculiarly enticing, and super easy to make. And it tasted good. This is 100% a must-try if you're looking for a new way (or old as it were) to do plain chicken. It's perfect on a cold, rainy night as it warms your entire house and smells "medieval." It's just such a special and wonderful recipe that I'm particularly thrilled to share with you all.

This recipe for Chicken Pye comes out of the 1675 cookbook, The Accomplish'd Lady's Delight in Preserving, 
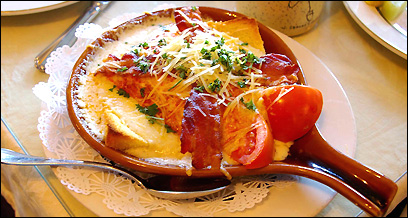
Physick, Beautifying, and Cookery. I've included the original recipe here because it's fascinating to read. After I've included my interpretation of it, which is the actual meal I prepared and have pictured here:

"To make a chicken-pye.
After you have Trust your Chickens, the break their Legs and Breast-bones, and raise your Crust of the best Paste, lay them in a Coffin close together, with their Bodies full of Butter, then lay upon them, and underneath them, Currons, great Reasons, Pruans, Cinnamon, Sugar, whole Mace and Sugar, whole Mace and Salt; then cover all with good store of Butter, and so bake it; then pour into it White-wine, Rosewater, Sugar, Cinnamon, and Vinegar mixt together with the Yolks of two or three eggs beaten amongst it, and so serve it."
And now my version of the recipe above:

Medieval Chicken Pye
2 large bone-in, skin-on chicken breasts
good salted European butter (recommended: French or Irish)
kosher salt
freshly ground black pepper
1 small onion, roughly chopped
1/2 cup dried currants
1/4 cup raisins (golden)
1/4 cup prunes, diced (can substitute dates)
2 whole sticks cinnamon
2 Tbsp granulated sugar
1/4 tsp ground mace
1/2 tsp whole black peppercorns
1 cup red wine
2-3 Tbsp rose water
2 Tbsp white balsamic vinegar

Preheat oven to 350 degrees.

Heat a heavy bottomed, oven proof pot like a Dutch oven, cast iron pot or Le Cruset on high heat. Season the chicken quite liberally with the salt and pepper. Add about a tablespoon of the butter to the pot and the chicken, skin side down. Brown on all sides until a good brown crust forms. Remove the chicken to a plate (it will still be quite rare) and set aside.
Add more butter (another 2 tablespoons or so) to the pot and add the onions. Saute on medium heat until just begins to soften, about 5 minutes. Add the currants, raisins, prunes, cinnamon sticks, mace and black peppercorns and mix to combine. Cook for 3 minutes to release the oils from the spices and to heat the fruits through. Carefully place the chicken back on top of the onion-fruit mixture. Add the wine, rosewater, and vinegar and bring to a simmer, uncovered. Once simmering, cover tightly with a lid and place in oven to bake.
Bake for 1.5 hours - 2 hours or until chicken is very tender, and the liquid has reduce and thickened. Stir it two or three times during the baking process and turn the chicken over twice and make sure to top it with the fruit and wine mixture during baking so the flavors can soak into the chicken. Serve hot.

My notes:
I used chicken breasts because I wanted a leaner meal. You can certainly use legs and thighs for an even richer dish.
You can use virtually any dried fruit combination. This would be amazing with dried cherries, blueberries, raisins and prunes. Cranberries tend to not plump back up as well as these other fruits, so I wouldn't bother making this dish with dried cranberries. Also try to pick a wine that compliments the fruit. A dry white wine as the original recipe would certainly yield a lovely flavor as well, but I like the color and richness a red wine gives this dish. Try a merlot, cabernet sauvignon or my personal favorite pick for this dish, a syrrah.
If you want to add fresh herbs you can throw in a little thyme, rosemary or sage as well.
This dish would be amazing with pork loin or pork shoulder as well as turkey legs!!! If you're looking for an alternative dish for Thanksgiving then this just might be the dish for you!
To go along with the Pye, I made a Pastry using one of my favorite ingredients, leeks. The recipe for the crust is from A Proper New Booke of Cookery and is remarkably similar to a basic short crust pastry we would make today in our food processors. The addition of eggs and saffron are amazing and give an unexpected flavor to the whole pastry:

Again, the original recipe for the pastry (with a translation from Medieval Cookery) and then my own interpretation of the whole dish done for the meal:

"To make short paest for tarte. Take fyne floure and a cursey of fayre water and a dysche of swete butter and a lyttel saffron and the yolckes of two egges, and make it thynne and tender as ye maye."

This translates to:
1.5 cups all-purpose flour
4 Tbsp butter
2 egg yolks
2 tsp salt
pinch of saffron
cold water
Mix flour, salt, and saffron together in a large bowl. Cut the butter and eggs into the mixture, adding enough water to make a dough. Let rest for 30 minutes then roll out and is ready to work with.

Leek and Cheddar Pastry
1 large leek, trimmed and cleaned and cut into 1/4 inch slices
butter
kosher salt
freshly ground black pepper
1 egg, lightly beaten
1/4 cup freshly grated good quality sharp cheddar
1 recipe short crust pastry (above)
heavy cream or egg wash
Preheat oven to 375 degrees.
Saute the leeks in a tablespoon or so of butter, seasoned lightly with salt and pepper. Once leeks are soft and caramelized (about 10 minutes) then remove to a small bowl and allow too cool slightly. Add the beaten egg and cheese and mix. This is your filling.
Roll out pastry dough into desired portions for smaller pies, or cut in half for two large pies. Stretch or roll out the dough into a flat disk and place some of the leek filling in the middle, then fold the pastry dough over making a rough moon shape. Crimp the sides of the pastry with your fingers, creating a seal. Brush with a little cream or egg wash, then sprinkle with more salt on top.
Place pies on parchment paper on a baking sheet and bake in oven 25-35 minutes, or until golden brown. Serve immediately.
My Notes:
You can stuff virtually anything in these pies. Do minced meat and vegetables, artichokes and spinach, cheese mixtures...even sweet fruits. The options are endless.
And because it was getting late, I cheated and used my food processor for the dough. :)

For more on medieval style cooking and authentic recipes, check out these fabulous websites:

Pascha Bread: An Easy, Adapted Recipe for the Modern Orthodox Cook

Wednesday, April 7, 2010


For those of you who don't know, I'm Greek Orthodox. A detailed description of that is another blog in itself, so we'll just cliff note it right now in food terms for Easter, breaking it down to: red dyed eggs, lamb, lemons, and pascha bread.

Pascha bread is a sweet yeast bread made with eggs, flour, honey, yeast, and traditionally an anise flavored ingredient that is served first thing to break the long fast after midnight mass early Sunday morning. The flavors, shapes and sizes of this bread vary with the culture. It can have a cheese mixture baked in the middle like a Danish pastry. It can be plain and made in a cross or rope shape, or a wreath as shown her. It can be topped with anything from sesame seeds to sea salt. Personally I'm not a huge fan anise flavored anything, so when I re-conceptualized this recipe, that was the first to go. Instead, I substituted with a much milder almond extract that paired beautifully with the honey and granulated sugar I sprinkled on top.

Traditionally, my grandma was the big cook in the family. But in her older age and since suffering a mild stroke earlier this year, she's all but retired from the kitchen. Since my mother is completely uninterested in cooking (apparently the gene skipped a generation), it's come down to yours truly to pick up the slack.

Easter foods are characteristically difficult. From intricately patterned breads like the traditional Pascha Bread (above), to big pieces of roasted lambs, complex soups made with various lamb "parts" and even Romania's answer to the Scottish haggis, the holiday is in no way easy. Add to that a week's long of masses at night, a horrendous fasting schedule, and midnight mass Saturday night and it's a recipe for Holy Shit Week.

But I managed to figure out some shortcuts, revamp some traditions to make them more palatable to this generations tastes and preparation time schedules, and voila! A pretty kickass feast.

I began by trying my hand this year at the pascha bread which I'd never made before. I'd never actually made bread before period, let alone one that required kneading, braiding, and the exact placement of dyed eggs. I had an aversion to yeast for the longest time. I had a feeling failing at a yeast bread would expose me for the fraud that I am. Truth be told, I suck at baking. A lot.

So I spent all of Thursday and Friday saying "Don't do the bread." "No, do the bread." "No, don't do the bread." Until I finally settled on doing the damn bread. And so after screwing up the first batch, I came out with a pretty damn good second batch that tasted good, was authentic, and surprisingly not that hard.

In researching recipes for pascha bread, I found anything from a simple yeast bread to a recipe to make 6 whole loaves, which is in one word: stupid. No one, and I mean NO one has time during Holy Week or any week for that matter to make fucking bread. And if you have two small kids like me and four dogs? Then it's just game over. So I configured a recipe for one loaf, with mild flavors that's easy to make. And took pictures to help out in the making process! Try it next year for Easter even if you're not Orthodox! It's a tasty bread that makes for a pretty presentation on the table as well!

Pascha Bread
4 Tbsp unsalted butter, at room temperature
2 heaping Tbsp honey
2 eggs, at room temperature
2 tsp (1 package) instant yeast
2 tsp kosher salt
1 tsp almond extract (or anise)
4 cups all-purpose flour + about 3/4 cup more for kneading
1 1/3 cup whole milk, at room temperature
parchment paper
4 hard boiled dyed eggs
1 egg yolk + 1 tsp water for egg wash
granulated sugar for dusting

In a standing mixer fitted with the paddle attachment, cream together the butter and honey on medium-high speed until combined. Add the eggs, yeast, 1 cup of the flour, salt and almond extract and beat until combined on medium speed, about 2 minutes. Next, add the milk and 2 cups of flour (saving 1 cup and the 3/4 cup for kneading) to the batter while mixer is on low speed, alternating between milk and flour. In other words, add some milk, then 1 cup of flour, more milk, the other cup of flour, then the rest of the milk.

Scrape down the sides of the bowl using a spatula and change out the paddle attachment with the dough hook. Add the remaining 1 cup of flour all at once, reserving the 3/4 cup amount for kneading to the side. Beat on low speed about 10 minutes. The dough will be very sticky and soft.

To knead the dough, dust some of the 3/4 cup flour on a flat surface (counter top, large wooden cutting board, marble board, etc.). Gather the dough into the middle and dust it with more flour. Now you're ready to knead. To knead the dough, bring the outside edges into the middle, folding it over the top, and push the middle towards the outside. Rotate the dough and repeat. Keep rotating, pulling from outside-in, pushing in to out and adding flour as needed so the dough doesn't stick. Knead for 5 minutes, then place dough in a lightly greased glass bowl to rest. Cover with a kitchen towel (or paper towel) and let stand in a warm, dry place free of drafts for 3.5 hours. I find it best to place it on a stove top with the oven on 275-350 degrees.

During this resting period, your dough will rise and double in size. This means the yeast is working. If it's not rising by 3.5 hours then that means your yeast was bad or old and you'll have to start over with good yeast.

Once it's risen then take your fist and punch the dough in the middle. This releases the air out. Cover it again with the towel and let it rise again, 1.5 -2 hours until it's puffed up again.

Now you're ready to braid.

Take your dough out on a very lightly floured working surface. Your braid needs to be around 2 feet long, so make sure you're working on counter space or a table that's long enough to accommodate it. Take the dough and cut it into 3 equal parts. Take one piece and roll it out into a rope about 2 feet long. Do the same with the other pieces.

Bring the ends of the 3 ropes together and push them into each other, creating a starting point. Then as you would braid a pony tail, start braiding down the ropes, crossing the outside rope with the middle one, all the way down:


..until you've finished braiding your whole dough:


As you can see, for me the braid started off rough and got prettier towards the end. Don't sweat it if that happens! Although professional grandmas all over Europe can braid these suckers perfectly, we are not those grandmas! And we can hide imperfections with the eggs later, as you'll see.
Take your rope and place it on a baking sheet lined with parchment paper (I forgot to do that), and make a wreath shape by joining the ends together:


It's now time to add your eggs if you like. You can certainly omit this step but the eggs are a characteristic part of this bread. Simply add already boiled and dyed Easter eggs to the bread. Tradition calls for red eggs, but we did pastels.


Carefully nudge in the eggs in the folds of the dough, using them to hid any imperfections.

Let the dough stand with the eggs for 40 minutes so the dough can rise a little above the eggs, securing them in. During this time, preheat your oven to 400 degrees.
Next, use the egg wash (combine 1 egg yolk with 1 tsp of water and lightly beat) or even plain milk and brush it on top of the bread. This will help the bread get golden brown as well as serve as a "glue" for any toppings. Then sprinkle the granulated sugar right on top. If you like, you can use sea salt or slivered almonds, poppy seeds or sesame seeds...whatever you like.

Bake in a 400 degree oven for 10 minutes, then turn the oven temperature down to 350 degrees and continue to bake 25 minutes until golden brown. Turn the bread halfway through the cooking process to ensure even cooking. (this means to shift the baking pan around, not turn the bread over on itself).
Let cool at least an hour before serving.
I like serving the bread with other snacky foods like dates and almonds. Everything about Orthodox Easter is symbolism. The 3 braids in the bread are the Trinity (father, son, holy spirit), the eggs represent the renewal of life, the dates are the sweetness of life and the almonds are the bitterness. This is life on a plate, represented.
Enjoy!